
In any kitchen, appliances play a vital role in simplifying our cooking processes & efficiency. Don’t believe me? Just tell me how long it takes for you to get frustrated finding the second hand-mixer blade in the back of the utensil drawer every Thanksgiving. … Yeah, me too. But, if you’re not using some sort of legit organization, you’re doing yourself a disservice. Here’s how to arrange kitchen appliances so you maintain easy access to your favorite appliances without having to keep them on the top shelf.
This post may contain affiliate links. As an Amazon Associate I earn commissions from qualifying purchases made through links on this post at no extra cost to you. Click here to read my full disclosure.
Most kitchen cabinets have space underneath for small kitchen appliances. And sadly, it’s the small appliances that can clutter countertops & the lower cabinet space. That makes it incredibly challenging to navigate the kitchen space effectively.
But today, I want to explore a few strategies for arranging both small & large appliances so you can optimize your kitchen functionality & streamline workflow. Because after that, you’ll be saving money in no time. We’ll look at the frequency of use, some storage solutions & then a few tips on what you can do with all that extra space too.
And if this is your first kitchen setup, don’t worry. By the end of implementing some of this, you’ll have a well-organized kitchen that’s just begging you to eat good food!
Assessing Your Appliance Inventory
Alright, we’re in the kitchen ready to get organized & arrange the kitchen appliances in a practical way. It’s time to start creating a storage area for our kitchen appliances.
Your first step should be taking in the scene, answering a few simple questions & categorizing things.
- How much space do you actually have (& maybe how much space do you need)? &
- What size appliances do you have that require storing? This includes all sizes, large & small; everything from your trusty coffee maker to the bulky stand mixer. But it does not include bigger appliances that tend to be more permanent like the range or fridge. Things that are more or less going to remain where they are indefinitely.
Categorize your appliances by size & frequency of use – whether they would be classified as countertop appliances or not. Items assigned “daily use” like maybe your coffee machine or toaster oven should have prime countertop space real estate.

On the other hand, the best place for those larger appliances that are less frequently used like the air fryer or instant pot might be behind cabinet doors or on your pantry shelves.
Be honest about which appliances you rarely use altogether & consider donating them or storing them elsewhere to free up valuable space in your kitchen.
Having an ice cream maker is really cool, but if it’s sitting for 9+ months a year & constantly being shuffled around, it might be a good idea to gift it. Ice cream can be made without an ice cream maker, just so you know. And it still comes out great!
How to Arrange Kitchen Appliances Using a Kitchen Layout & Zones
If you kitchen isn’t already broken down into a 4-corners kitchen, start there. The 4-corners kitchen is a system of breaking your kitchen/food areas into zones. And more specifically, food storage but if you’re already aware of how zones can help you be productive it’s good to plan an arrangement for everything else too.
Btw, a 4-corners kitchen has food stored in the fridge & freezer (zones #1 & #2), a working pantry (#3, this is your cabinets/closet) & an extended pantry (#4, this is long-term stored food for emergencies). However, stock from that last zone should be rotated through to avoid over decay.
Get to know your kitchen layout. When it comes to learning how to best arrange kitchen appliances, you’ll find there’s actually a few standard kitchen zones like a prep area. Maybe you have one or maybe yours is a cutting board laid over the kitchen sink. Hey, I’ve been there. Or maybe your food preparation zone is the kitchen table or the kitchen island.
And lastly, you have any amount of precious counter space that comes with the design of your kitchen. Any space that is also a functional space can be used for multiple purposes.
You should dedicate your prime countertop space to the appliances you use most often, like the coffee maker, toaster oven & food processor. That’s a great way to store appliances out in the open if you prefer seeing them. But it’s also handy because when you already don’t have much room, the things you need are readily available to you.
Assign specific areas for larger appliances, taking into account their weight & size. Because trust me, you do NOT want to store something heavy or any bulky kitchen appliances on the top shelf. You’ll risk dropping it on your head when you go get it. It needs to be accessible yes, but safe too.
Establish dedicated zones within your kitchen layout for specialty appliances like roasters, bread makers, & that ice cream maker you still have but don’t really need. This will streamline meal prep & any baking projects.
You can also arrange similar appliances together within these designated zones. If you group all your baking appliances or breakfast gadgets then you’ll create cohesion, plus it’ll make for some really efficient workstations too!
Implementing Storage Solutions
Make the most of lower shelves by storing heavier appliances such as a kitchen aid if you have one & pressure cookers. This will help prevent any lifting-related injuries too.
Optimize wall space by installing a magnetic strip where you can store smaller metal appliances like knives, immersion blenders or maybe an electric kettle. The magnetic strip is cool because it keeps these small kitchen gadgets accessible yet off the countertops, mostly.
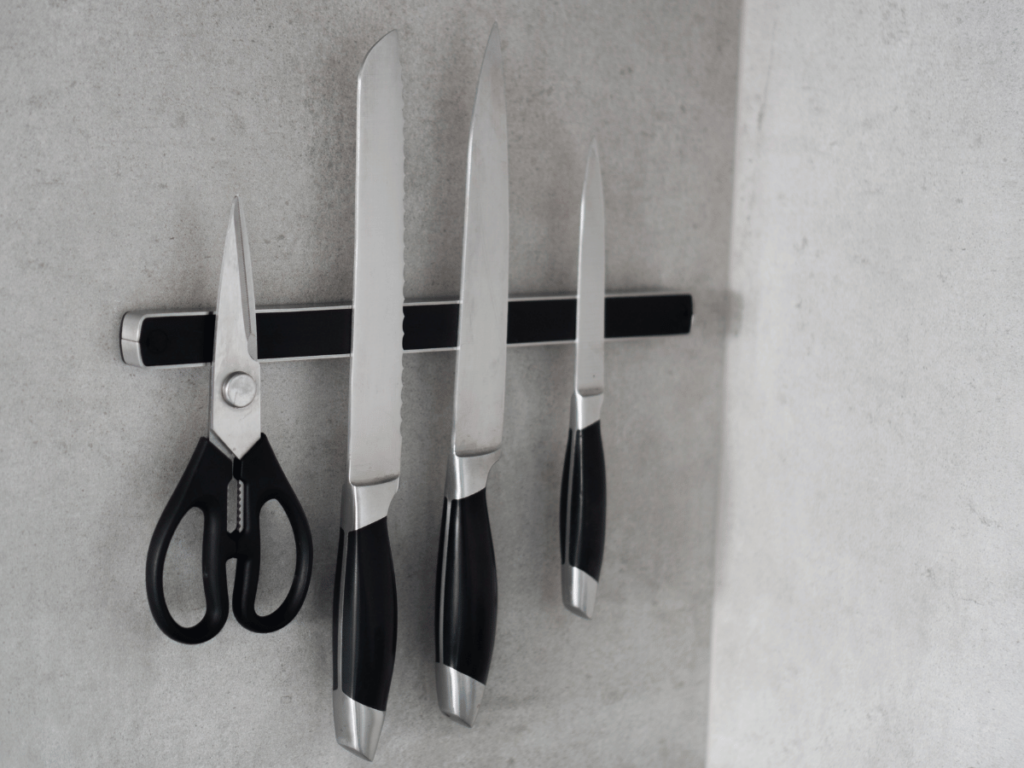
Our third apartment had two installed & I loved them. One was above the kitchen sink & that made a big difference when I’d wash dishes. I could just stick my utensils & things up there to dry. The other was hung up higher on the wall by the fridge & while it was a little less used, it was convenient. I’d recommend adding one by your stove also for spice trays or other small items.
You can increase storage & flexibility in your kitchen by using a rolling island or cart. This is an especially great idea in smaller spaces because you can find carts in various sizes. Then use it as an added prep area or for small kitchen organization on the go!
When not it use, it can be wheeled into another area. Maybe a nook, the dining room or along the hallway wall.
But maybe you have some unique challenges. No problem, there’s a solution for you too.
Here’s 3 Common Kitchen Layout Challenges
Challenge 1: Limited Counter Space
Couldn’t we all use a little more workable counter space like we could all use an extra hour or two in the day?
Solution: Maximize vertical storage by installing shelves or racks above countertops to store lesser-used appliances like waffle makers. And use multi-functional appliances that can do double or triple the task. This will reduce the need for separate devices too & that could save you some money. But it’s saving you space instantly because you won’t need to arrange so many kitchen appliances since they’re like a 2 for 1 combo!
Challenge 2: Cluttered Cabinets
Ughh, sometimes they seem to grow on their own.
Solution: Regularly purge unused, duplicate or rarely used items to free up cabinet space. Smaller kitchens by design sometimes have limited kitchen storage space anyway so really keep this in mind as you work on how to setup your first kitchen. Or as you’re walking the home goods section of your favorite thrift store – yet again. You can also invest in a few stackable, collapsible storage containers to keep things organized.
Challenge 3: Inefficient Layout
The “Who thought this was a good idea” of all kitchens right? Ahahah
Solution: Maybe changing the kitchen layout isn’t in the cards without tearing down a wall or two. But you can reorganize your kitchen zones by grouping similar appliances together either by their frequency of use or task. You don’t need to hire a professional organizer for this because you can create customizable storage solutions with a little creativity & less than $30 most times. (Why? Because you’ll purge for one. Remember Challenge #2 up there? And also because you can find LOTS of great small space storage organizers & accessories in local Buy Nothing groups or thrift shops.
Extra Tips to Maximize Cabinet Space
- Organize cabinets & cupboards based on the frequency of use. Put your everyday items like the slow cooker or rice cooker within easy reach. Less frequently used appliances towards the back.
- Use a lazy susan or pull-out shelves for corner cabinets so you can get into those awkward spaces & maintain some visibility to what’s going on back there.
- Store unused kitchen appliances at the back of the cupboard or in higher shelves to free up prime storage space for essentials.
- If you’re an avid baker (or want to be!), you probably have collected several kitchen counter appliances. The best way to gain some great space is to make an appliance garage. Or use shelf risers inside your cabinets that can elevate your machines to the kitchen countertops when you need them.
Now you know how to arrange kitchen appliances
With the right approach to kitchen appliance organization, you can transform your kitchen into a functional & clutter-free space. This will give you so much more peace of mind being in the kitche & maximum efficiency.
I’m confident you’ll begin to love the way the space looks & how it makes you feel in your daily life as you move about it. Just remember to consider some key factors like the frequency of use, your specific kitchen layout & smart storage solutions.
No matter if you have a lot of kitchen appliances or just a handful of smaller appliances, the easy way to optimize your kitchen space for maximum productivity is to use designated zones. That’s just the best thing I can tell you. Everything has a place & everything in it’s place right?
It might take some hard work getting to a point where you’re as self-sufficient in the kitchen as you want to be. But it gets easier when the entire space is pointing you in that direction you know?
And remember, you don’t need to do this alone. Get your entire family involved. That’s another one of my best tips! Ask them to help you set up this really great space where you make delicious soul-comforting food. Or will soon learn how to hello. And get their help to maintain a well-organized kitchen that supports all of your cooking goals.
You’ve got this lovely!

🌱 Start Small. Start Now. Start where you are with what you have. The rest will follow. 🌱

Is being more self-sufficient something you’re interested in but don’t know where to start?
The Self-Sufficient Roadmap is for you!
Designed it to eliminate some of the overwhelm, find out exactly where you are & what to look forward to next.
Leave a Reply